Tuesday, September 9, 2014

Homemade Chewy Granola Bars


Need something quick and easy to eat on-the-go? These granola bars are simple to make and can be made in advance. They are perfect to have as a quick breakfast or as a mid-day snack! One batch makes a fill 7-11" pan. 

Primary Ingredients:
2 packed cups of dates (I used 8oz bags of pitted dates)
½ cup of honey (Agave or maple would be appropriate substiutues)
½ cup of natural peanut butter (or almond butter)
2 cups of chopped almonds (I mixed chopped and whole almonds)
3 cups of old fashioned oats

Extras Ingredients:
I added a 5oz bag of cherry juice infused Craisins and a few dashes of cinnamon

Directions:
In a food processor, chop the dates until they roll up in a ball (probably about 30 seconds).

Mix together the oats, almonds and dates.

In a saucepan or pot, heat the peanut butter and honey until it is mixed.

I didn’t do this, but next time I will break up the date ball into the peanut butter/honey mix so that it will stir easier.

Then mix all the ingredients in a bowl and add in the extras that you want (in my case, Craisins and cinnamon). I used my hands to mix it thoroughly.

To get the chocolate on the bottom, I melted a handful of semi sweet chocolate chips in a bowl and then spread it into a 7x11” glass pan lined with wax paper. I pressed the mixture onto the melted chocolate.

Let the chocolate harden.

They can then be stored in an air tight container, or frozen to preserve them for even longer!

Sunday, September 7, 2014

Huevos Rancheros


Everyone knows that Sundays were MADE for delicious brunches. After taking a trip to Albuquerque, New Mexico, I officially declared Huevos Ranchero as one of my favorite meals. In my attempt to create my own version, I found it to be quite an easy dish to make!

What you will need:
1 corn tortilla
1/2 cup of black beans (or pinto beans if you prefer those)
1/4 an avocado sliced
1 egg
1/3 of a small tomato, sliced
a handful of shredded lettuce
2 tbsp of salsa
a sprinkle of Mexican Blend cheese

To make this dish, start by heating 1 tbsp of olive oil in a skillet on medium heat. Once heated, "fry" the tortilla until golden brown and cripsy. Set the tortilla aside and layer with beans, lettuce, and salsa. Add a little more oil in the pan, and cook you egg any style you like (I prefer over easy). Once the egg is cooked to your liking, put it over everything. Garnish the plate with your tomatoes and avacodo.

And there you have it!

Wednesday, September 3, 2014

End-of-Summer Dinner Party


To celebrate the end of summer, my best friend Kate, of Sara Kate Styling, and I decided to host an "End-of-Summer" dinner party! With Kate's styling expertise, and my cooking skills, our party was nothing short of being fabulous!

While getting set up, we sipped on an amazing cocktail made of:
1 liter of lemon-lime soda
a quarter of a watermelon, cut into wedges
and a cup of frozen peaches (fresh peaches work as well)
*For an adult version, add a bit of peach flavored vodka*


As an appetizer, I got creative with your typical "caprese" flavors and made tomato stacks with sliced mozzarella and basil, finished with a drizzle of balsamic and olive oil (this is one of my all time favorite flavor profiles)!


I then made duck as our entree. Now, I was a little bit nervous making duck. I had never made it before and had always hear that it was very technical (which it was). But, that being said, anyone can make it! You just have to pay careful attention as you cook.

I started pre-heating my oven to 375 degrees. I then covered an oven-proof pan in butter and turned my burner to med-high heat. As my pan was heating, I used a sharp knife to score the duck skin (about 3/4" deep). The trick to cooking a perfect duck breast is to render the fat. Once heated, I put the duck breast (skin side down) on the pan. as the fat renders, it will build up in the pan. It is important to drain the fat off as it renders (you can save this fat for later). Once the fat stops rendering and you no longer have to pour it out, flip the duck breast onto the meat side and sear for 1 minute. 

Once seared on both side, stick the duck in the oven (I left my duck in the pan and put the entire thing in the oven. If you do not have an oven-proof pan, you can transfer the breast to a baking sheet and cook it that way. You will bake the duck for about 12 minutes, until it reaches the internal temperature that you prefer. This comes down to personal preference. I cooked my duck a little more well-done and paired it with locally grown roasted cherry tomatoes and green beans!


It was a busy day, but also a fun one! Can't wait until our next party! Cheers!


Monday, August 12, 2013

Organic Balsamic Pizza

Everyone knows that feeling when you have a certain food on your mind for so long that you just HAVE to have it. Well, in my case, I had been craving pizza. I didn't want to order a huge greasy pizza, nor did I want to buy a processed frozen one. So, to solve this issue, I decided to make my own healthier and more delicious pizza. I thought about what I would want on my "ideal" pizza, and came up with fresh basil, oregano, kale, and mushrooms, finished with a drizzle of balsamic and olive oil. I owe a huge "thank you" to the healthy super market, EarthFare, in Boone, NC, for offering me a coupon to receive organic mozzarella, organic pizza sauce, and an organic pre-made dough crust for only $3! 
Ingredients
One pre-made dough
Pizza sauce
Shredded mozzarella
Sliced mushrooms
A handful of fresh kale
Fresh basil
Fresh oregano
Balsamic vinegar
Extra virgin olive oil

This is a very easy and delicious recipe. Make note that I made a mini pizza. The ingredient quantity will greatly vary from person to person, depending on how big, saucy, cheesy, or "vegetabled" you will want your pizza. 

Before I started, I heated a baking sheet at 425 degrees to get it nice and hot. This will help your pizza to cook in the middle. Now, all you have to do is cut up your veggies, roll out your dough and start assembling! once you have made your personal pizza, you simply place it on the hot baking sheet and bake for approximately 15 minutes at 425 degrees, or until the outer crust is golden brown.

Once cooled, garnish with a drizzle of balsamic and olive oil.


Friday, July 5, 2013

My Graduation Dinner

My graduation dinner was one of the most memorable evenings I have ever had! My entire family came  up to the mountains and we all went to Rowland's! I was with the people I love the most at one of the places I love the most. Below are just a few pictures from the night.
Our view before dinner. It had been raining, but luckily the clouds started breaking up when we got there.


This is the traditional place setting of Rowland's. You can also see my made-from-scratch margarita there ;) The second picture is of the "amuse." This is just something special the restaurant does for the guests.
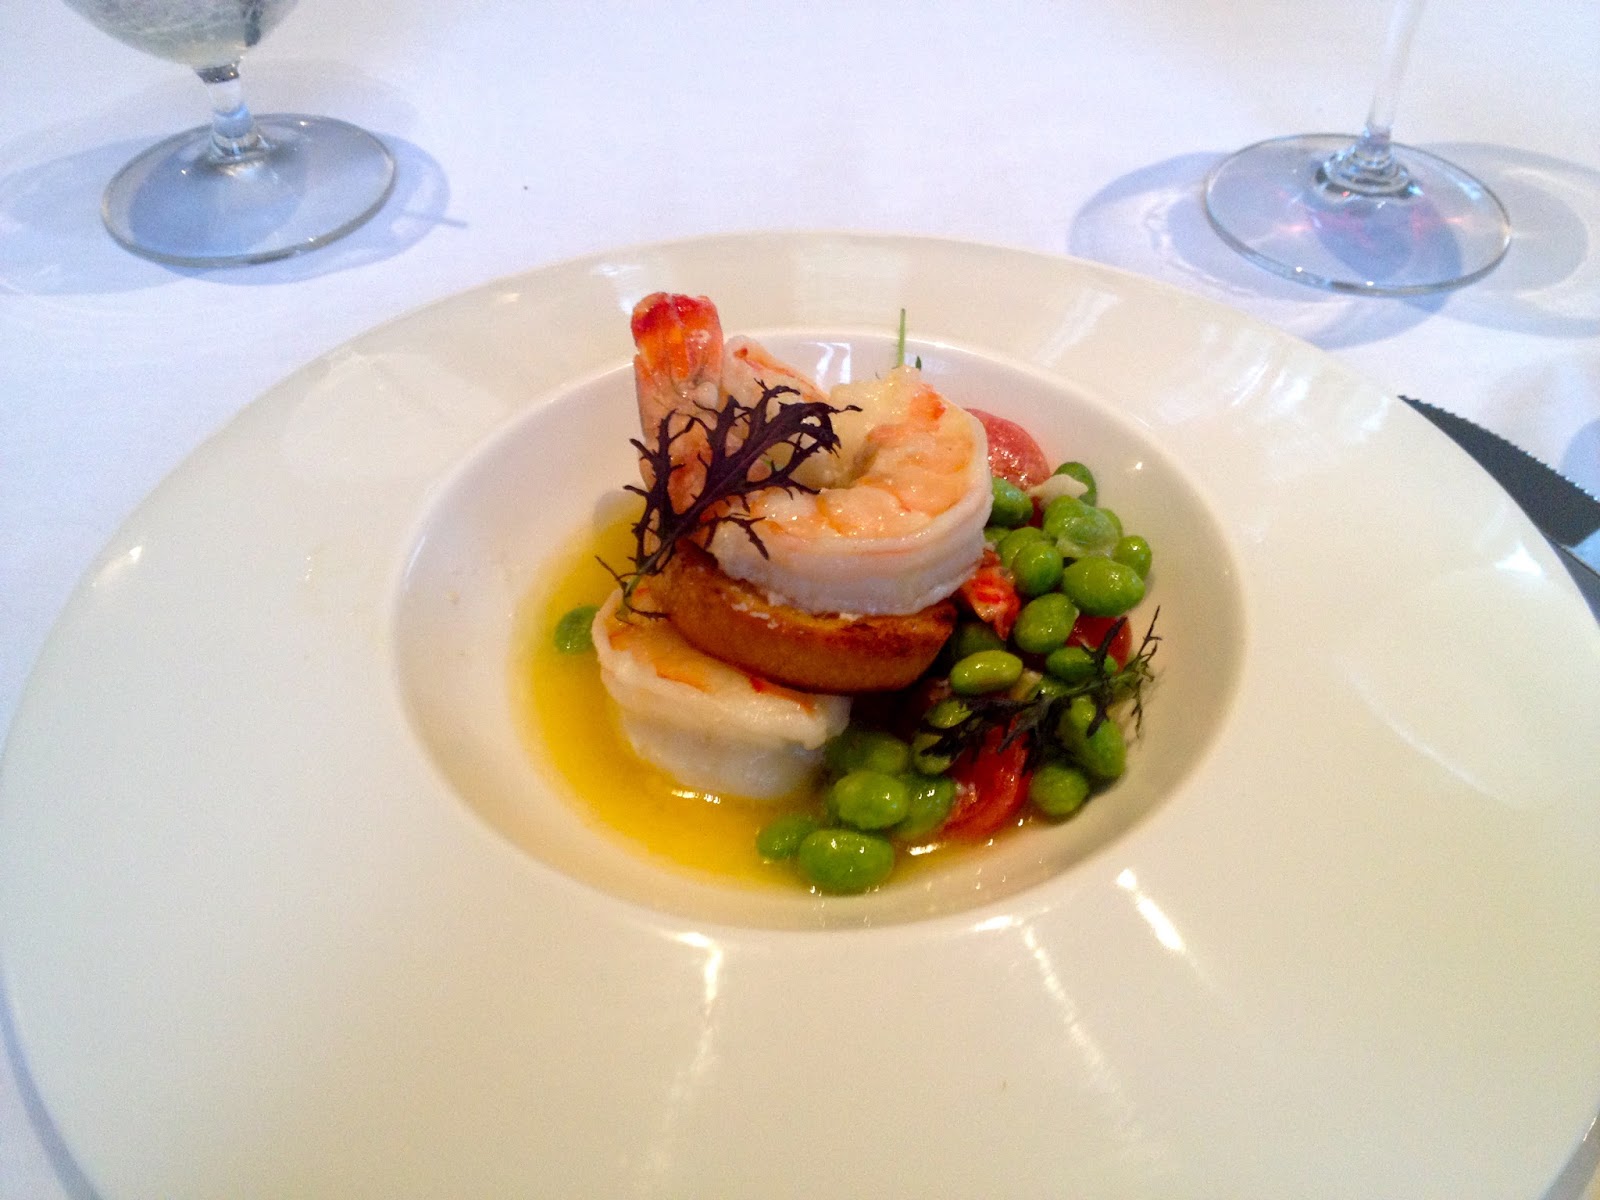
This was my three course meal. I started with a restaurant favorite, the "Prawn." I then had Lamb for dinner and finished the night off with a chocolate torte (if I were still working there, I probably would have made that torte). The meal was outstanding and they even put a candle on my dessert to celebrate my graduation!  
Before I left, I went back into the kitchen to see everyone and they surprised me with a bottle of wine (which they all signed), and a free (second) dessert! Oh, how I miss being there!
Lastly, here I am with my lovely family! 


Thursday, July 4, 2013

New Orleans

Traveling with my family is an entirely different experience. We hit the ground running! As soon as we arrived at our hotel, we hit the street. We walked down Bourbon Street all the way to Jackson Square. on the way back, we made our first stop at La Fitte's. Lafitte's is the oldest bar in America. It has no light, except that which is from windows and candles.
We then headed up to a classic Bourbon Street balcony to have a few drinks before dinner. This was our view!
That night, we ate at Emeril Lagasse's restaurant, Nola, which I unfortunately did not get any pictures of. I was too excited to eat my plate of BBQ Shrimp and Grits! Passing on dessert, we decided to go to New Orlean's classic landmark Cafe Du Monde to indulge on beignets!
The rest of our time there, we were able to taste all of the classic New Orleans style food, such as a tradition Fried Oyster Po' Boy from Johnny's Po' Boys,

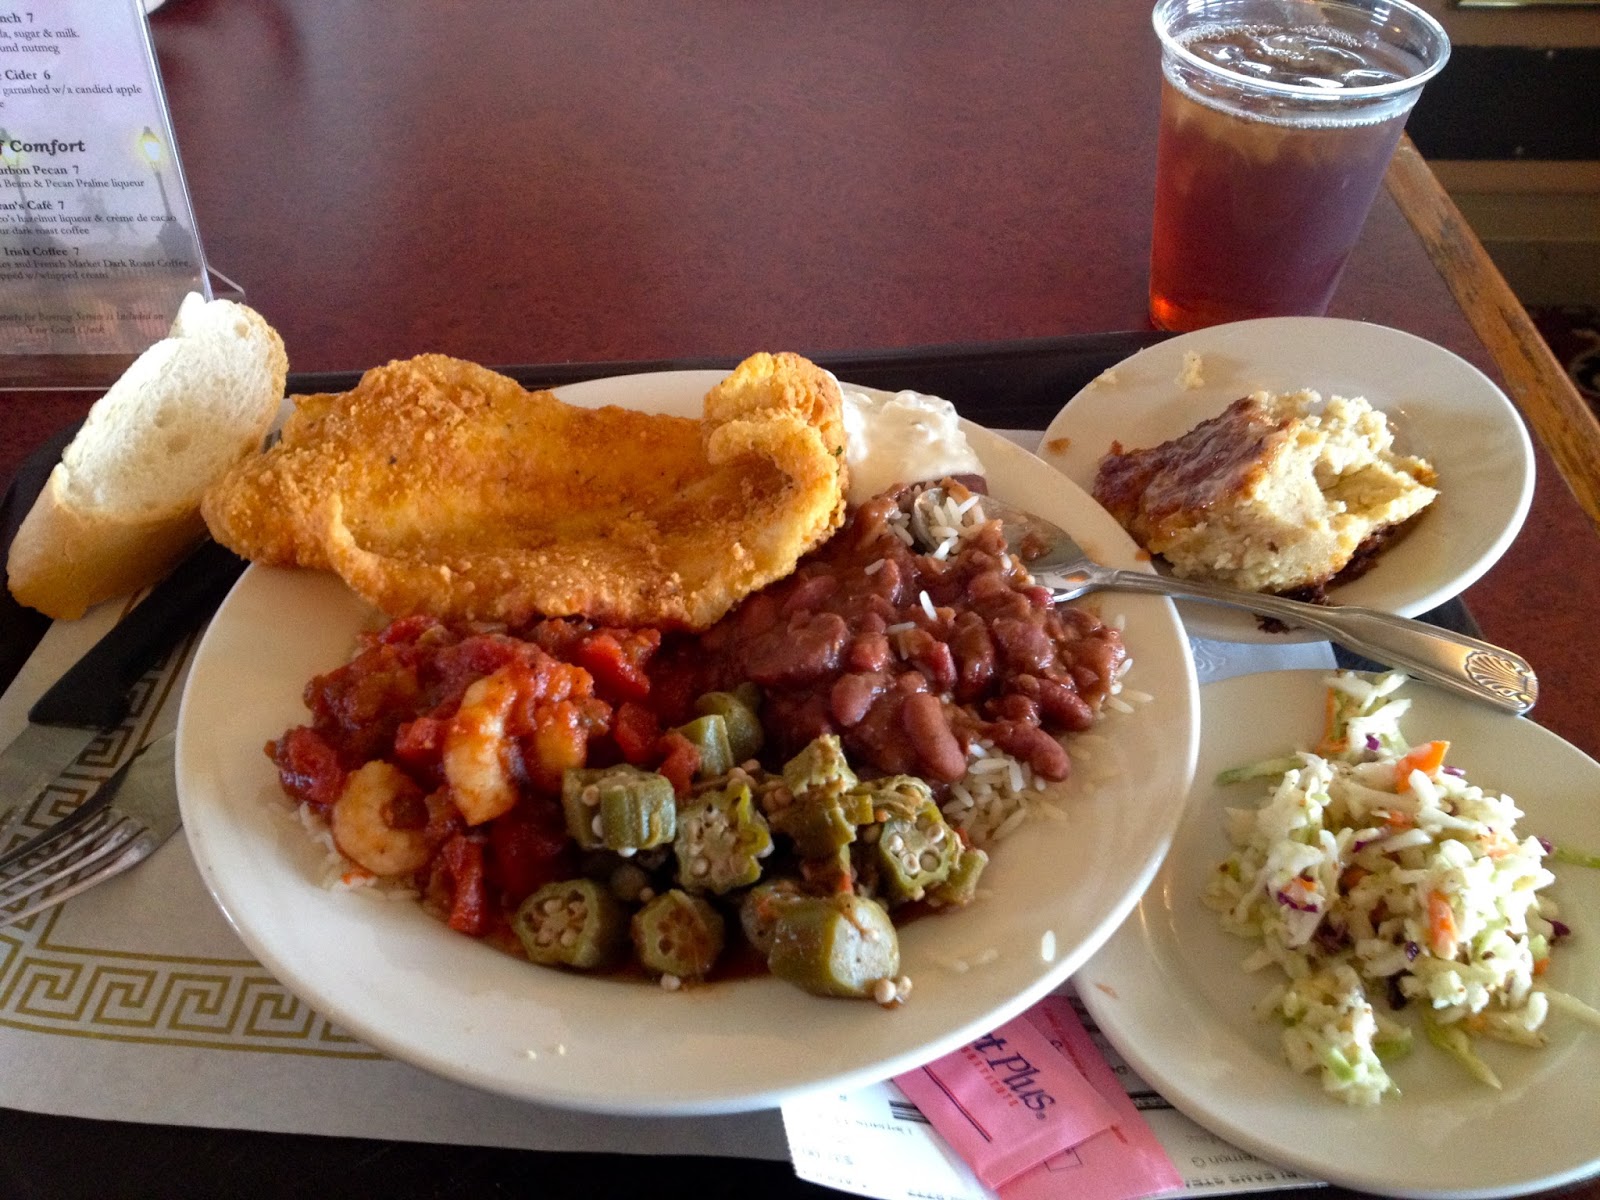
fried fish, red beans and rice, creole jambalaya, okra, and coleslaw from Steamboat Natchez,


more jambalaya and shrimp gumbo from the famous Crescent City Brewhouse,
and lastly, a tender piece of red fish caught straight out of the Pontchartrain River, from none other than the restaurant, Red Fish!
                              
Though my vacation ended, I hope to go back to New Orleans very soon! There was so much more to do than what we had time for! New Orleans is one of the leading destinations for any food lover!

Monday, November 12, 2012

Cold Weather = Chili Time!

White Bean and Chicken Chili with a Homemade Whole Wheat Garlic-Parmesan Drop Biscuit

There's nothing like a hearty soup on a cold snowy day! As soon as I found out that it was going to snow in the mountains, I immediately pondered the idea of making chili. I wanted to make something a little different than typical bean and beef chili, so I went by the local fruit and veggie stand near my apartment. As soon as I saw the new bins of raw beans and fresh bundles of kale, I knew what I wanted to make!

Ingredients for the chili:
1 cup of raw white Great Northern Beans
8 cups of chicken broth (low sodium)
1 bunch of kale
1 white onion (coarsely chopped)
2 cloves of garlic (minced)
1 serrano chili (minced)
1 tablespoon of olive oil
about 7-8 chicken tenderloins
*cumin, red pepper flakes, salt and pepper

I cooked the beans in 50/50, chicken broth /water. This was the hardest part of the entire recipe. If you have never cooked raw beans before, be sure to keep checking on them throughout the hour to hour and a half of cooking. Beans absorb water quickly, so you want to make sure they do not burn.

In the mean time, while your beans are cooking, you can chop your onion, and mince your garlic and serrano chili. Set aside your minced chili for later and saute the onion and garlic together in about a tablespoon of olive oil. Once slightly tender, rake onions into a bowl to add to the chili later. use the same pan to saute the kale. set this aside in a bowl as well.

Boil the chicken in water for about 30 minutes or until the center is no longer pink and a internal temperature of 165 degrees is met. Once cooked, let the tenderloins cool and shred (I just used my hands to shred them).

Ingredients for the Garlic-Parmesan Biscuit:
1/2 cup of all purpose flour
1/2 cup of whole wheat flour
1/2 cup or grated parmesan cheese
3/8 cup of milk (I used soy, and it worked just fine)
2 tablespoons of butter
1/8 teaspoon of garlic powder
1/2 teaspoon of salt
1 teaspoon of sugar
1/2 tablespoon of baking powder
1/4 teaspoon of baking soda

Preheat oven to 425 degrees. Lightly spread olive oil on a baking sheet.

In a large bowl, stir together the flour, garlic powder, baking soda, baking powder, salt and sugar. Then add the butter using your fingers until you create a crumbly dough. Stir in the parmesan until evenly combined.

Create a well in the center of the dry mixture and pour in the milk. Mix until combined.

Place the dough on a lightly floured surface. Flour your hands then knead the dough 8-10 times.

Place "handful sized" mounds of dough on the oiled baking sheet, then bake for approximately 10-12 minutes or until the tops start browning. While warm, put extra parmesan on the biscuits.

* Be sure not to over-bake or the biscuits will be too dry!

Enjoy!


(Please excuse the lack of style in this picture)