Wednesday, October 24, 2012

Bouchon Bistro - Palazzo Las Vegas

Bouchon is a restaurant from Chef Thomas Keller. If you don't know who he is, you should! He has been named the best chef in America by the James Beard Foundation.


Our meal started with this creative way to serve bread. The waiter just came and dumped it on our table! They also served us some complimentary pistachios.


My first course appetizer was this salad. It's listed on the menu as:

Salade de Ris de Veau 
crispy sweetbreads, Bloomsdale spinach, 
braised radish & pickled cherries 
with mustard seed vinaigrette
It was quite a unique salad in my opinion. My mom ordered the same thing. 


Dad's first course:
Laitue 
bibb lettuce & garden herbs 
with house vinaigrette


Brother's first course:

Salade d’Orge 
toasted pearl barley, young artichokes, 
kale, pickled pearl onions, lemon suprêmes, 
pine nuts with currants & barigoule emulsion 
This was an interesting dish to me. Its a salad primarily composed of kale and pine nuts.


This was a special, therefore the dish wasn't listed on the menu. It was scallops over pea and basil soup with mushrooms. This is what I ordered...Very good!!


Mom's main course:

This was also a special for the night. It was veal with fresh vegetables. I wish I knew more about what was in it, but this is what my mom had.


Brother's main course:

*Steak “Bouchon” 
grilled New York steak, riz rouge with celeriac lyonnaise 
& sauce bordelaiseDijon mustard & petite baguette 


Dad's main course:

*Gigot d’Agneau 
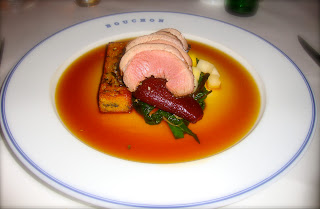
roasted leg of lamb, crispy subric, red wine poached pears 
with rutabaga & rosemary lamb jus


After dinner we were way to full to have dessert, but I would guarantee that the dessert items would be nothing but perfect!


Everything was delicious and "pretty" in my opinion. If you find yourself in Vegas, I would definitely recommend Bouchon!

Wednesday, October 17, 2012

Filet Mignon


Filet mignon is probably my favorite thing to eat. I LOVE it. I always thought it would be hard to make the perfect filet, but figured I would one day just have to give it a try! I have to say; it wasn’t as hard as you would think. All you need is confidence and a good meat thermometer (unless you have that talent of “poking and knowing” haha)!

Ingredients:
1 tablespoon of butter
1 filet mignon
* salt and pepper


Pre-heat the oven to 400 degrees and season the filet with salt and pepper.

Heat the butter in a pan on high heat until melted. Once the butter is melted, turn the heat down to medium-high, place the filet in the pan and sear on all sides (about 3-4 minutes).

Transfer the filet to an oven proof dish and finish cooking it in the oven for about 8-10 minutes for a medium steak. For me, the best way to know if it is done is to simply use a meat thermometer. This way, you won't have to cut it open and risk losing any flavor!

Rare: 135 °F/57 °C
Medium-rare: 145 °F/63 °C
Medium: 160 °F/71 °C
Well-done: 170 °F/77 °C

Once your steak is done to your liking, take it out and “tent” it with foil for at least 10 minutes. This step is very important. Tenting your meat helps it to retain juices.


Once Meat has been tented, it is ready to eat!

*Note: You may want to consider saving the meat drippings from the baking dish to enjoy with your steak!


Personally, I enjoyed my filet with winter squash risotto (see recipe for "Winter Squash Risotto"). I think steak and creamy dishes compliment each other very nicely. I also used the meat drippings to drizzle over the top!

Monday, October 15, 2012

Viva Las Vegas!


Just got back from Las Vegas! While I was there I ate at the restaurants of many well known chefs! I'll be posting pictures when I can, so get excited to see some outstanding meals! If these aren't inspiring, then I don't know what is.

Sunday, October 7, 2012

Winter Squash Risotto


Ingredients:
3-4 cups of assorted winter squash (I used one small butternut and 2 small acorn)
1 cup of Arborio rice
4 cups of chicken broth (I used low sodium )
½ cup of heavy cream
1 tablespoon of yellow onion
½ cup of grated parmesan cheese
1 tablespoon of butter
1 tablespoon of olive oil
1 teaspoon of dried sage
1 teaspoon of dried thyme
*white pepper and salt

Start by cutting the assorted squash in half. Coat the insides of the squash halves in olive oil and roast squash at 400 degrees for 1 hour. For butternut squash, separate the bulb-like/hollow bottom half from the solid top half. Lay olive oil coated squash “bowls” flesh side up on a baking sheet. Put solid butternut squash halves face down in ¼ inch of water and roast for 1 hour.


Take out and cool squash halves.

Scrap the squash from the peeling and mash together.

Put in a blender and puree. I added a small amount of chicken broth to the blender to help the squash puree.

In the mean time, whip the cream until a soft peak in obtained. Fold in squash puree (about 4 cups) until a desired taste is reached.

Get the chicken broth boiling in a pot.

Melt the butter in a saucepan and sauté the onions until tender. Be sure not to burn the onions.

And the cup of rice and spread it in the pan on med-high heat. Let the rice cook for about two minutes. Stir often to be sure the rice does not burn.


Add a cup of the boiling broth to the rice. Let cook until almost dry (about 5 minutes). Then and another ½ cup of hot broth and let cook again until nearly dry. Stir often throughout the entire process to ensure the rice is being evenly cooked. Do this until the rice is done to your liking. My total cook time was around 25 minutes. You want to make sure that you do not over cook the rice or else it will become mushy. While the rice is cooking, this is when you can season it the sage and thyme, or other choosen seasonings


Once the rice is done, add 1 cup of whipped squash and ½ cup of parmesan cheese. 


Season with salt and pepper and enjoy!


Monday, October 1, 2012

Basil Infused Whole Wheat Pasta with White Wine Marinara

So I used my pasta cutter for the first time! This is definitely my most intriguing recipe yet! Making pasta is easier than most would imagine!

Pasta
3 cups of all purpose flour (I used 1 ½ cup all-purpose and 1 ½ cup of whole wheat to make “whole wheat” noodles)
4 whole eggs
water as needed (I ended up using about ¼ cup of water)
7 chopped basil leaves (optional)
*salt
1 tablespoon of olive oil

Start by measuring out the flour in a bowl and mixing in the basil, and a pinch of salt. Then make a well in the center of the flour-basil mixture (this is key when making noodles).  Add tall 4 eggs into the well. Gradually mix, slowly bringing the flour into the eggs. A dough ball should begin to form. If the dough is not forming, add a little bit of water. If the dough is too wet, add more flour.


Once the dough has formed, knead it on a floured surface for about 4-5 minutes. Then put a little bit of olive oil in the palm of your hand (using the 1 tablespoon from the recipe list), and coat the dough ball with it.


Then cover the dough and let it rest for an hour.


After the dough has rested, you are now ready to start making your fresh pasta! Start by cutting the dough ball into fourths. Take one fourth, flatten it with you hand and dust both sides with flour. Put your pasta roller on level 1 (as wide as it goes) and roll the flattened fourth through it. Dust it again, fold in the corners and roll it through the machine again. Do this about six times. Doing this finishes the kneading process.

Below are pictures of the process.

Initial rolling of the flattened dough.


Flouring both sides.


Fold the pasta as if you were folding a brochure.


Roll through the machine.


Repeat process 5 more times.


Now put the roller on level 2 (the next smaller setting) and roll the dough through once. Then again on level three, and so on until your desired thickness is reached. Be sure to keep both sides of the dough floured inbetween roll, so that the dough does not stick to the roller. I stopped at level 5 for my pasta. Once you dough is at desired thickness, attach the spaghetti/fettuccini cutter and roll the dough through!

**Note: Once you have started thinning the dough, you do not need to keep folding it inbetween roll-throughs. Additional folding would over-knead the dough, making the end product much tougher.


Although I only ate one portion of spaghetti, I went ahead and rolled out one more spaghetti and two fettuccini nests. I placed these on a cookie sheet lined with wax paper and froze them for another time!


Cooking your fresh pasta:
You cook fresh pasta the same way you would cook dried pasta! Just add the noodles to salted, boiling water. Be sure to keep an eye on them though! Fresh pasta cooked way quicker than dried pasta. My noodle cooked in about 5 minutes. I just kept checking them every minute or so until I was satisfied with their texture.


**Note: If you don’t have a pasta cutter, there is still a way to make fresh noodles! It will be a little harder, but you can always use a rolling pin to roll out your dough and use a knife to hand cut your noodles.


White wine- marinara sauce
2 tomatoes, chopped and then blended until smooth (you can just crush them if you prefer a more chunky sauce).
1 tablespoon of olive oil
½ cup or red onion, ½ cup of yellow onion
3 minced garlic cloves
1 teaspoon of red pepper flakes (I used a tad more since I like spicy food)
1/3 cup of white wine (I used a chardonnay)
*pepper (I prefer white pepper)
*salt
Start by heating the olive oil and red pepper flakes on medium heat. Once heated, add the chopped onions and minced garlic. Let cook until the onions have become a little tender and aromatic. Add the white wine and stir. Let this cook for a minute and then gradually add the blended (or crushed) tomatoes (by adding gradually, you will make sure that the ingredients balance out, i.e. you don’t want to overpower the onions and garlic by adding too much tomato). Turn the heat down, stir in salt and pepper, and let flavors simmer (note: the sauce will reduce a little bit).


This is the wine I used for my sauce.


Sorry for the lack of sauce making pictures, but here is the sauce before it has simmered.


I let my sauce simmer while I was boiling my noodles.
(The sauce looks a little discolored due to the stovetop lighting).


Combine and enjoy!